
| FAQs |
Frequently asked questions about Titley Scientific bat detectors, recorders, microphones, Insight software, and troubleshooting.
Click here to jump to a FAQ section
General Questions
GeneralDetection distances vary with the frequency and loudness (amplitude) of bat calls, atmospheric attenuation, the directional characteristics and sensitivity of the bat detector, and the amount of structural clutter (such as vegetation) which can block the signal path.
The frequency and amplitude of the bat call has a major influence on detection distance. Quiet (low amplitude) calls are more difficult to detect than loud (high amplitude) calls. Call amplitude can vary within an individual — many bats reduce the amplitude of their calls as they approach prey or clutter — and also varies between species. "Whispering bats" (species that always produce low amplitude calls) are more difficult to detect from a distance. Additionally, higher-frequency calls cannot be detected from as far away as lower-frequency calls, as higher frequencies attenuate faster in the atmosphere.
Atmospheric attenuation depends on weather conditions such as temperature, humidity, and air pressure. In general, cool dry conditions allow detection of bat calls over greater distances.
The sensitivity of the detector also has a major influence on detection distance. The biggest influence here is the setting of the sensitivity control.
Given all of the above, detection distances will vary enormously. Many bats are easily detected over 30 m under typical conditions, while some low-frequency species may be detectable from as far as 100 m. However, some species will be hard to detect from even 1 m away. This is why only relative rather than direct statistical comparisons of bat activity are made between species.
Further information on detection distances and the calculation of detection fields can be obtained from Chris Corben's AnaVolumes software: http://users.lmi.net/corben/Beta/
Titley Scientific does not support the use of MicroSD adapters in our devices. MicroSD-to-SD adapters are prone to unreliable connections and are often of poor-quality construction. Their use can result in data loss and unreliable performance. These risks make them unsuitable for critical field data collection, where full-sized SD cards are much more reliable.
There are two main recording formats for bat files: zero crossing analysis (.zc, .zca, & .xx#) and full spectrum (.wav). Full spectrum records the full spectral information within a sound file, just like a music file. Zero crossing analysis renders the spectral information down into a series of time vs. frequency dots.
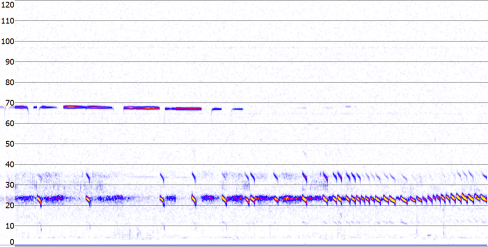 Full Spectrum
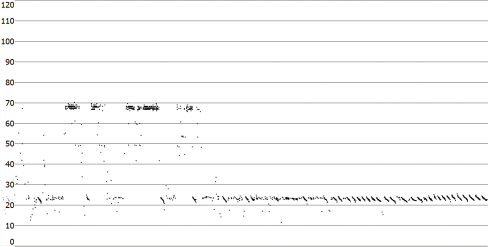 Zero Crossing
The advantages of full spectrum include the ability to see intensity, harmonics, multiple bats calling at the same time, and faint bat pulses during high ambient noise. The disadvantages are that full spectrum files are much larger (typically 6 times the size of a zero crossing file), require more processing power to record, and are slower to render for post-recording analysis.
The advantages of zero crossing analysis are the small file size (memory space is rarely an issue) and that many published guides to bat calls are based on zero crossing analysis. The disadvantages are that spectral information is lost (which may be helpful to species identification) and that in cases of high-frequency ambient noise (e.g. insects), bat calls may not be recorded fully.
It is important to note that post-recording full spectrum files can be converted to zero crossing, but zero crossing files cannot be converted to full spectrum. Deciding which recording format is best depends on the aims of your survey, the recording environment, and your data storage budget.
There are a number of file types used by Titley Scientific detectors. The Ranger, Chorus, Walkabout, and Scout can record in either full spectrum (.wav) or zero crossing (.zc) — you can select your recording format on the detector. The Walkabout additionally allows you to record both formats at the same time.
The Anabat Express (no longer available) records zero crossing analysis files in .zca format, which records one file per night. The .zca can be split into individual .zc files using Insight.
All Titley Scientific detectors now save metadata in the GUANO (Grand Unified Acoustic Notation Ontology) format. This format is now the standard across bat acoustic fields. GUANO is also supported by the Insight software package.
On our passive detectors, such as the Ranger and Chorus, there is a Night-Only mode. This mode uses the built-in GPS to determine your location, calculates the sunset and sunrise times, and will automatically record from 30 minutes before sunset until 30 minutes after sunrise. It will continue to record in this mode until the batteries run flat, the card/s become full, or you turn the detector off.
This mode requires a GPS fix when first deployed, so make sure the Check LED on the front of the detector has stopped flashing to indicate the detector is ready to deploy. You can also use schedule mode to manually specify a location, for situations where GPS is not available.
The recording mode (set by the Mode button, e.g. Night or Continuous) refers to when the recorder is "active" or "listening". In continuous recording mode, the recorder is listening all the time (24 hours a day). It won't necessarily record files when it's listening — that depends on the activation setting.
The activation refers to when files should actually be saved to memory. Constant activation means files are continuously recorded (without gaps) regardless of what sound, if any, is present. In triggered activation mode, files are only saved if sounds pass certain trigger settings.
Summary:
- Continuous + Constant: Saves all sounds, without gaps, 24 hours a day for as long as battery or memory cards last.
- Continuous + Trigger: Saves only files when a 'triggering' sound occurs, 24 hours a day.
Unless you are using constant recording mode, your detector will not be constantly saving files — it relies upon triggers to decide when to save a file. These triggers can be adjusted by the user to optimise the detection of bats based on local conditions and species. Trigger settings include sensitivity, minimum trigger frequency, maximum trigger frequency, minimum event time, and trigger window. You can set all trigger settings on the device.
Please see individual user manuals for explanations on trigger settings and how to adjust them.
When you have a multi-channel detector (one that can accept multiple microphones), there is a lot of new terminology to understand:
- Mono — Recording one file from one microphone. This is how traditional bat detectors (like the Swift) work.
- Stereo — Recording one file from two microphones. The recording will have multiple channels, which are slightly different depending on microphone placement (one microphone will be closer to the sound).
- Dual — Recording multiple files from two microphones, but not simultaneously. For example, you can record from the acoustic microphone at 5pm, then from the ultrasonic microphone at 6pm.
- Simultaneous — The ability to record multiple files from two or more microphones at exactly the same time. For example, recording from the acoustic microphone AND the ultrasonic microphone at the same moment. The Ranger is the only detector on the market that can record acoustic and ultrasonic simultaneously.
Acoustic and ultrasonic refer to generally accepted frequency ranges. Acoustic is recording audible sounds (e.g. bird calls), whilst ultrasonic is recording high-frequency sounds (e.g. bat echolocation). There is some overlap between acoustic and ultrasonic frequencies.
Acoustic generally means between 20 Hz and 20 kHz, whilst ultrasonic generally starts at 10 kHz and extends beyond 250 kHz. Microphones are designed to record either acoustic or ultrasonic.
Sample rate refers to the number of samples per second taken during recording, measured in kilo samples per second (ksps). The recommended sample rate should be at least double the highest frequency of interest. For example, if your highest-frequency bat echolocates up to 150 kHz, your sample rate needs to be above 300 ksps.
The default sample rate for acoustic recordings is 44.1 ksps. A suitable sample rate will depend on the frequency of the sounds being recorded — it needs to be at least double the highest-frequency sound you want to record. For example, since koalas make low-frequency sounds, a sample rate of 22.05 or 32 ksps is often used. For best sound quality, a sample rate of 44.1 or 48 ksps is recommended.
The gain setting is how much amplification is applied to the signal. A higher gain setting will pick up sounds from further away, but at the cost of distorting loud or close sounds through over-amplification. Conversely, a lower gain setting is used to record sounds close to the detector that are expected to be fairly loud. A gain setting of +12 dB is a good starting point for general applications.
Note that the Ranger supports gain settings for the side-mounted acoustic microphones only.
We no longer make Australis receivers, radio tags, collars, or yagi antennas. We do still supply radio-tracking accessories including chargers, car chargers, and battery packs. We no longer service Australis receivers and yagi antennas.
Each device will have a sticker with SN: XXXXXX. The six digits are your serial number.
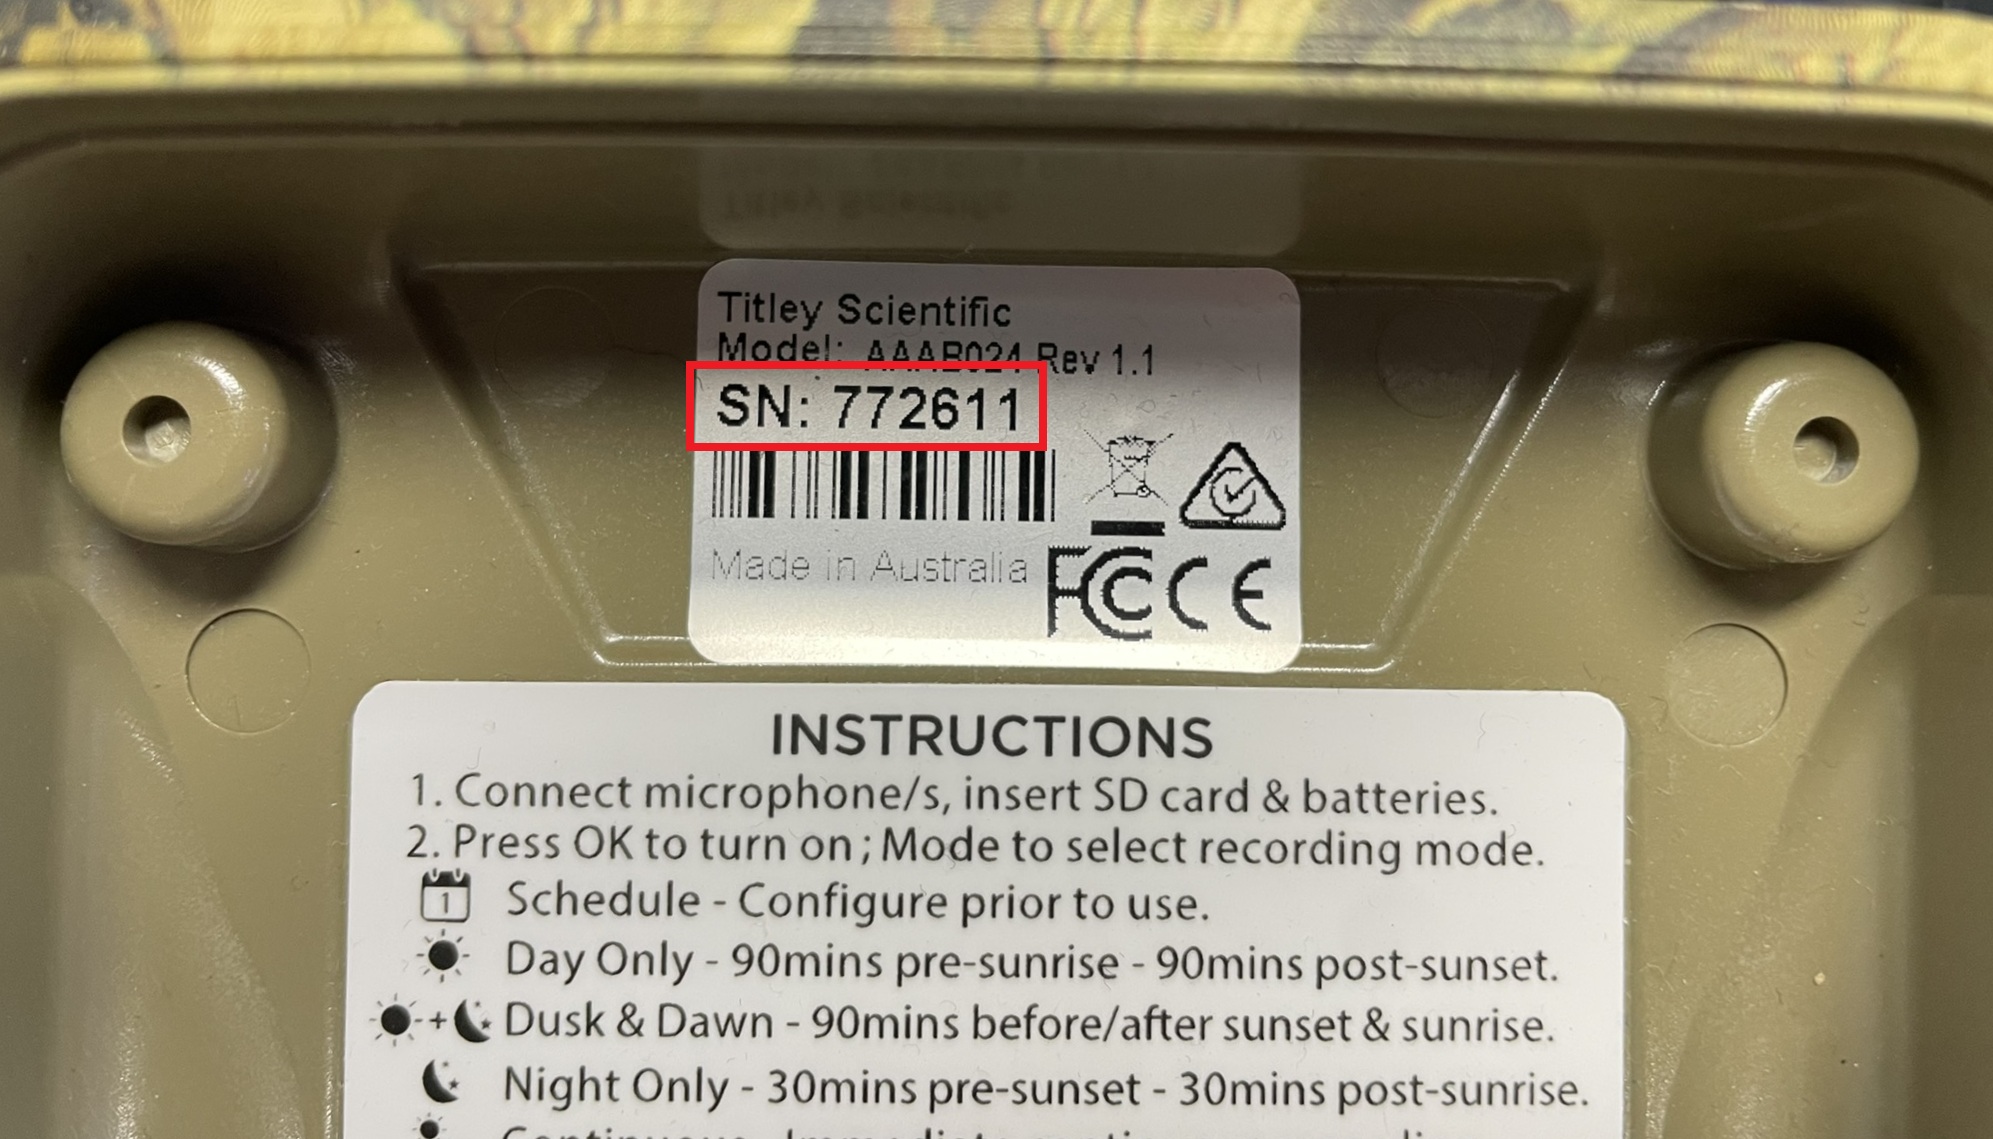
- Ranger and Chorus - Inside the case on the right side, above the instructions sticker there is a silver sticker with the serial number.
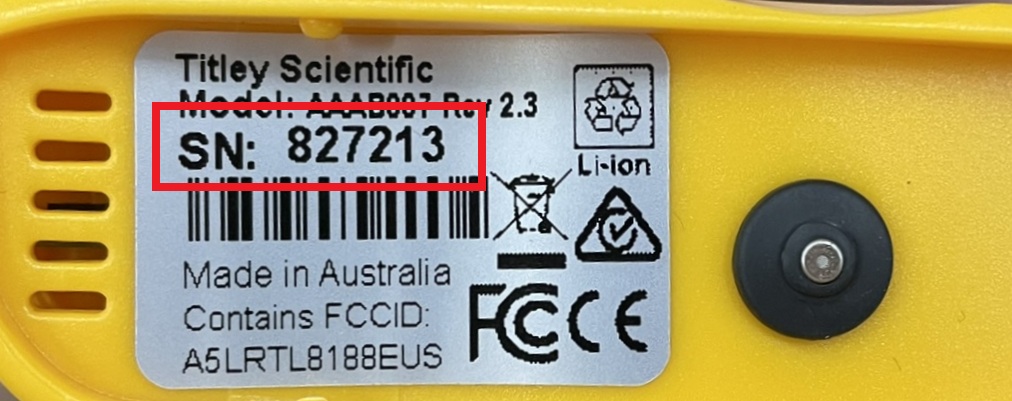
- Walkabout - Remove the grey directional cone (or microphone adapter) from the top of the Walkabout. On the top of the Walkabout there is a silver sticker with the serial number.
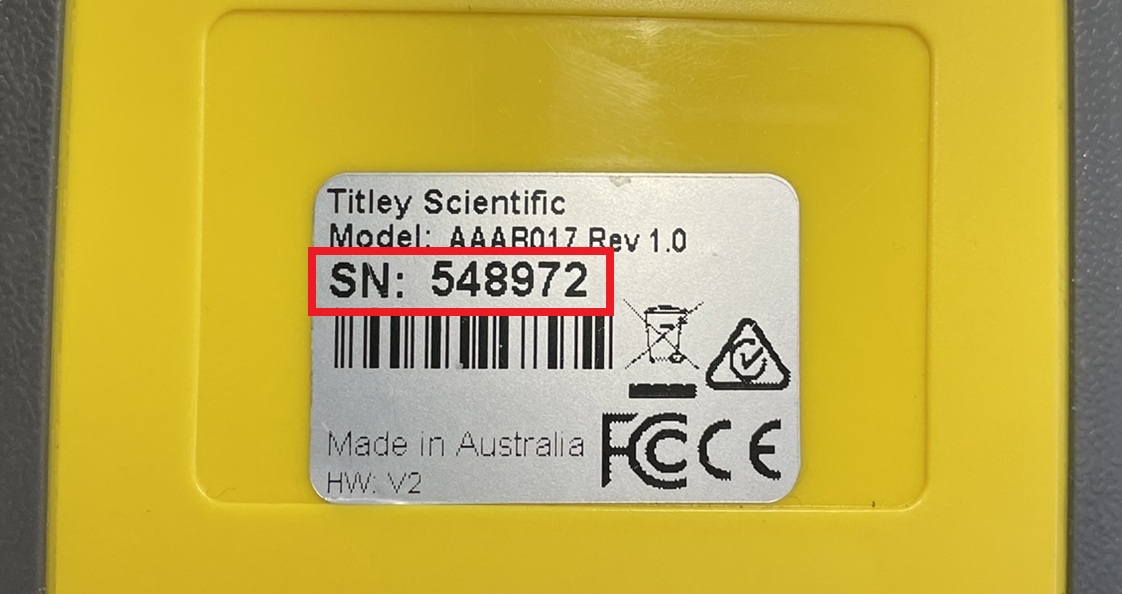
- Scout - On the back of the Scout above the battery compartment there is a silver sticker with the serial number.
- Swift - Below the touchscreen there is a small sticker with a barcode. The serial number is beneath the barcode on the left.
- Express FS - Inside the case on the right side, above the instructions sticker there is a white sticker with the serial number.
- Express - Inside the case on the right side, above the instructions sticker there is a white sticker with the serial number. If this is missing, above the batteries there is a small sticker with a barcode. The serial number is beneath the barcode on the left.
Microphones
MicrophonesEach microphone has an area of detection; the shape of this area relates to the directionality of the microphone. An omnidirectional microphone has a roughly spherical area of detection, whilst a directional microphone has a lobed (Christmas tree-shaped) area of detection in front of the microphone.
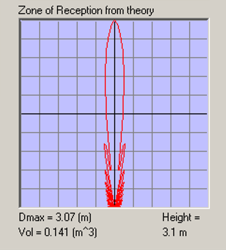 Directional
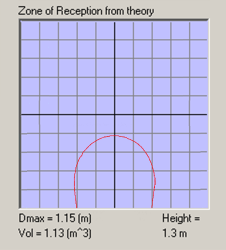 Omni-directional
Typically, a directional microphone will detect a bat from further away, but only directly in front of the detector. An omnidirectional microphone will detect a great volume around the microphone.
Which microphone is best depends upon your recording requirements. For example:
- A directional microphone may be best if you are recording a reference call and only want to record a particular individual in flight, or if you are conducting an active transect with spotlighting where you can follow the bat with your detector.
- An omnidirectional microphone with a cone may be best where you are performing a walking transect and do not want footfall noise.
- An omnidirectional microphone may be best where you are performing a passive survey where there is no clear flyway.
Speak to your local distributor about which microphone may suit your needs best.
This will depend on your survey aims, but here are some general pieces of advice:
- Mount horizontally to prevent water droplets hitting the microphone element. Water droplets generate large amounts of noise and can block ultrasound signals until they dry out. Sensitivity can be reduced by inclement weather. Do not let heavy rain land directly onto the microphone element — the impact force of raindrops can permanently damage the sensitive element.
- Mount at a flyway if possible (and if not contradictory to survey requirements). A flyway is a corridor where bats will fly through or beside vegetation, such as a track or open gully. Do not point the microphone across the flyway, but instead along it — this will increase your chances of recording a longer, high-quality pass.
- Avoid mounting directly at a dam or lake unless specifically required. Bats approaching water to drink often change their search phase calls, making species analysis more difficult. Water can create echoes (if flat) or ultrasonic noise (if turbulent), and is likely to be home to a multitude of noisy insects. Instead, place the detector along the flyway approaching the water source, or further back from the water's edge.
- Mount on an extension cable away from flat surfaces if possible. This is especially important for the omnidirectional microphone, which will record echoes from the detector surface or any large nearby flat surface. Mount on a pole or small post/tree if possible.
- Protect against electrostatic build-up — windy, dry conditions can cause damage to the microphone. Also be aware that mounting on a tall mast may attract lightning. To minimise electrostatic risk, isolate the detector from ground (operate from internal batteries, or ensure any external power supply doesn't have a path to ground). In dry conditions, avoid tall non-conductive masts (fibreglass, nylon); wood or metal masts are preferable. Ground the microphone by clamping it to a grounded metal surface or attaching an earth wire to the body of the microphone.
For more information on mounting, placement, and weatherproofing considerations, see your detector user manual.
Microphones exhibit a 'frequency response', which means they have differing sensitivities at different frequencies. A microphone may be very sensitive at 40 kHz, then lower sensitivity at 60 kHz, then very sensitive again around 80 kHz.
Microphone sensitivity doesn't flat-line at a specific frequency but tends to 'roll off' around a certain frequency. When we refer to the 'maximum frequency', this is the point where the frequency response has begun to taper off. However, the microphone can still detect higher-frequency sounds — they just need to be louder or closer to the microphone.
Microphone sensitivity can be affected by a range of environmental and physical factors. Inclement weather, especially rain landing directly on the microphone element, can reduce sensitivity and may even permanently damage the element. Electrostatic build-up in dry, windy conditions is another risk.
Older microphones can also lose sensitivity over time. If you are using legacy microphones (e.g. from older Swift or Express units), it is advisable to have them serviced and tested for functionality before deployment.
Mounting the microphone away from flat surfaces, and using an extension cable to separate it from the detector body, will also improve effective sensitivity by reducing echo contamination in the recordings.
Ranger & Chorus
ProductThe Chorus comes supplied with a low-profile acoustic microphone, which will have a wind sock attached. The acoustic microphone will be underneath the cardboard insert in the box, below the detector. If you purchased an ultrasonic microphone, this is also a low-profile ultrasonic microphone and will be pre-mounted on side B (the hinged side) of the Chorus. The acoustic microphone can be mounted on either side, whilst the ultrasonic microphone can only be mounted on side B.
If the Check LED is flashing without the magnet applied, it means there is an issue affecting deployment. Do not deploy until you resolve the issue. To check the issue/s, open the case and look at the status message/s on the dashboard.
Common issues include locked SD cards, no GPS fix, and no microphone detected for the recording settings chosen.
On the Ranger you can record ultrasonic and acoustic at the same time (even stereo acoustic).
On the Chorus you are unable to record ultrasonic and acoustic simultaneously; however you can create a schedule to record ultrasonic and acoustic during the same deployment. For example, you can record acoustic through the day and ultrasonic through the night.
When recording in full spectrum, excessive echoes ("messy" spectrograms) are likely due to echoes from where the microphone was mounted. We recommend mounting the recorder away from any flat surfaces (such as boxes or walls). This will produce much clearer recordings.
Accessories to mount the microphone away from the recorder can also help and are available from Titley Scientific. A gooseneck accessory on the Chorus, and a microphone extension cable on the Ranger, can be used to mount the microphone away from the surface of the recorder itself.
While these recorders are designed for passive monitoring, they can be used as an active recorder by connecting your headphones. You can also use the built-in GPS to log your track using the Transect Mode function.
No, the Chorus cannot be powered externally.
The Ranger can utilise external power and solar panels.
The Chorus is only compatible with the low-profile ultrasonic and acoustic microphones.
If you need to use a directional microphone, you will need to use a Ranger.
Theoretically yes, however performance may be compromised. Microphones lose sensitivity over time, so you should have them serviced to check their functionality. Additionally, older versions of the microphone (whilst they may work) will use more power than our current microphones, so battery life will be compromised.
If you are using the Ranger with an ultrasonic microphone to record ultrasonic frequencies (e.g. bat echolocation), check the following settings:
- Mount an ultrasonic microphone to the front channel (channel C).
- Place the recorder in your desired Recording Mode (e.g. Night Only, Continuous, Schedule).
- Choose your preferred profile: Full spectrum ultrasonic (.wav) or Zero crossing ultrasonic (.zc).
If you are using the Ranger with acoustic microphone/s to record audible frequencies (e.g. birds, frogs, other vocalising wildlife), check the following settings:
- Mount one or two acoustic microphone/s with windsocks on the recorder.
- Place the recorder in your desired Recording Mode (Continuous, Day Only, Night Only, Dusk & Dawn, or Schedule).
- Choose the acoustic recording profile.
It is always best to have a memory card that exceeds your expected capture requirements. You can use the data estimator tool in Toolbox within Insight to help guide this — ensure your activity level in Toolbox is set to High.
There are several options to reduce the number of files recorded:
- Check your trigger settings to ensure they are optimised for your deployment. Specifically, ensure your minimum trigger frequency is set as high as possible without missing your lowest-frequency bat, and your minimum event duration is not set too short.
- Lowering the sensitivity can help reduce the number of files, though this will reduce the ability to record quiet sounds.
- Turn on the noise filter to separate unstructured noise from structured noise (such as bat calls), and choose the overwrite setting to delete noise files when memory storage runs low.
You can also reduce the size of files recorded. Higher sample rates equate to larger files, so reduce your sample rate to the lowest possible setting without missing your highest-frequency bat.
Finally, you can apply noise filters to your data during post-recording analysis in Insight (free to use). There is a built-in 'AllBats' filter, and you can utilise other filtering features (smoothness, synthetic filters, metric parameters) to sort files into useful batches and eliminate unwanted noise.
In some cases (e.g. BTO Pipeline or Kaleidoscope) the sample rate prevents the file from being opened or processed. This is due to the precise sample rate being reported in the WAV file metadata. For pre-existing recordings with this issue, you can use a third-party application such as Audacity to resample your existing data to the required sample rate. For future recordings, make sure the WAV sample rate setting is configured to Standard. Please refer to the WAV Sample Rate setting section in the Ranger user manual.
Inside the case on the right side, above the instructions sticker there is a silver sticker with the serial number. The six digits next to SN: are your serial number.
Anabat Scout
ProductThe division ratio is set at 8. The division ratio affects the amount of data saved in zero crossing recordings — the lower the division ratio, the greater the number of data points in the resulting sonogram. The division ratio for the FD audio output is 16.
Sample rate refers to the number of samples per second taken during recording, measured in kilo samples per second (ksps). The sample rate of the Anabat Scout is 320 ksps.
To improve the GPS lock, move to an area with a clearer view of the sky for better satellite reception. You can still record without a GPS lock, but timestamp and location data may not be accurate. Initially, your GPS data may be less accurate, but this will improve within a few minutes as more satellites are locked.
The bat counter creates a .csv spreadsheet from presses of the In and Out buttons on the detector. Each In or Out record is time and date stamped, and records a total tally of ins and outs along with the GPS location at each button press. This feature is designed to help with roost emergence counts.
On the back of the Scout above the battery compartment there is a silver sticker with the serial number. The six digits next to SN: are your serial number.
Anabat Walkabout
ProductThe gain of the amplifier is preconfigured to suit the full dynamic range of the microphone, so no adjustment is required. Faint calls can be made brighter on the display by adjusting the spectrogram brightness and contrast settings.
If you want to keep your selected settings from being accidentally changed, we recommend saving them in a profile where the important settings are locked. That way, your helpers can still collect data without altering your settings accidentally.
If you are using a full spectrum display, you may need to adjust the spectrogram brightness/contrast settings. Very faint calls will need high brightness and contrast settings. If you are using zero crossing display, you may need to increase the zero crossing sensitivity — increase it right up to the point where you start to get the occasional dot drawn on the graph by background noise.
Full spectrum display and recording is recommended when looking for faint/whispering bats or when maximum sensitivity is required.
Alternatively, your detector may have frozen. This is most commonly caused by an unsuitable, old, or partially full SD card. Ensure your memory card meets the minimum SD card requirements and is empty/formatted before each recording session.
If there is a large amount of low-frequency noise present, you can adjust the trigger frequency range to exclude signals below a certain frequency. For example, if there are a lot of insects below 10 kHz, you can set the minimum trigger frequency to 10 kHz and auto record or the compressed view will then ignore any signals outside that range. You can also try using the clip-on directional cone attachment.
When you receive your detector, charge the batteries fully (with the detector turned on) before first use — this calibrates the battery gauge. You can repeat this process at any time to re-calibrate. If you have done this, try using the power-saving options outlined in the user manual.
If you believe your detector has a faulty battery, please contact your local distributor. Typically the detector will run for approximately 6 to 8 hours depending on use and the number of files being saved. In Screen Off mode the detector will record for approximately 12 hours.
A directional microphone has several advantages over the built-in omnidirectional microphone:
- It picks up sounds from a specific direction, allowing you to isolate bat calls from a target area (e.g. a roost) and/or reduce background noise (e.g. insects, road noise).
- It is capable of recording at higher frequencies (roll-off occurs around 250 kHz).
- It can record bats at a greater distance compared to the omnidirectional microphone.
- It can be mounted on the Walkabout, or on an extension cable, which is ideal for driving transects. We also sell a car mount for this purpose.
Remove the grey directional cone (or microphone adapter) from the top of the Walkabout. On the top of the Walkabout there is a silver sticker with the serial number. The six digits next to SN: are your serial number.
Insight
SoftwareInsight does not identify bat calls to species. It does have a plug-in for BatClassify UK, which will perform automated identification of UK woodland bats. Outside of this region, automated identification is not currently provided.
Insight does have filters, search, and decision tree tools that you can use to build your own automated identification system. If you are not confident with species identification in your region, you can still use Insight to separate noise files and reduce the volume of files being sent to an expert for analysis — this will likely save you money on analysis costs.
The functionality and features of the free and paid versions are exactly the same — the only difference is the type of files that can be opened and analysed.
The free version will only open files from Titley Scientific's current detector range: Ranger, Chorus, Walkabout, Scout, Swift, Express FS, and Express. In the case of the Express, a firmware update (released several years ago) is required to sign the files as they are being recorded.
The paid version will open any file from any detector, including competitor brands and historical datasets from older Anabat devices.
The BatClassify plugin will only analyse full spectrum files (.wav). It should also be noted that BatClassify only identifies the woodland bats of the UK.
Check if Insight has access to the internet by selecting Help, then Check for Update. If the window appears with an error message, Insight is being blocked from the internet, or you are not connected to the internet.
Ensure your internet connection is working. If it is, try disabling any antivirus software or firewalls. Once they are disabled, see if the maps load. You may need to create exceptions for Insight in your antivirus software.
Before you can add an action, you need to ensure the search criteria is clicked/selected in the search bar. Once selected, the Add button will be available.
A floating panel may disappear off screen if using multiple monitors, or may be accidentally closed. To bring back a panel, click on Windows, then Dockable Windows, then Restore Windows.
Yes! Insight can open files of any sample rate, including acoustic recordings. You can even analyse stereo acoustic recordings. Here are some helpful tips:
- Choose which channel you want to view and/or listen to from stereo recordings, or have both.
- Recommended settings for acoustic analysis: Timescale of F3, Frequency scale of 0–20 kHz, Truetime mode. For assistance setting any of these, please see the Insight user manual.
- Split recordings into shorter sections to make processing easier.
- Skip to the next trigger point to just listen to important sounds.
- Crop files to sections of interest.
- Add species labels directly to the metadata of recordings — no need for separate spreadsheets or documents.
- Add other important metadata to files, such as site names, habitats, and weather.
- Optimise FFT window size for viewing your recordings.
Please note: the free version of Insight will only open acoustic recordings from Titley Scientific's range of recorders (Ranger, Chorus, and Swift). To view, open, or analyse recordings from other brands, you will need to purchase a full licence.
Swift & Express / FS
ProductWhile these recorders are designed for passive monitoring, they can be used as an active recorder by connecting your headphones. You can also use the built-in GPS to log your track using the Transect Mode function.
Yes, using an appropriate solar panel, battery, and regulator system. Contact your Titley Scientific distributor for more information.
To resolve this issue, try resetting the location (turn the detector off then on again) where you have a clear view of the sky. Also ensure you are running the most recent firmware version — to do this, see here.
If the issue persists, don't hesitate to contact your local distributor for assistance.
When recording in full spectrum, excessive echoes ("messy" spectrograms) are likely due to echoes from where the microphone was mounted. We recommend using the supplied extension cable to mount the microphone away from the detector itself, and away from any flat surfaces (such as boxes or walls). This will produce much clearer recordings.
The Anabat Express only records in zero crossing (.zca). If you require full spectrum, you may like to consider a full spectrum upgrade for your Express, which can be performed by our distributors.
Your detector will look the same, with a similar user interface on the inside. There will be an extra button that allows you to swap between full spectrum (FS) and zero crossing (ZC) recording, as well as adjust the sensitivity between 3 levels. More detailed settings can be adjusted by connecting the Express FS to a computer via USB, as it is now.
ZC files will be recorded in .zc format (individual sequence files), not .zca (an entire night's recording) like it previously did.
The new SD card size limit will be 512 GB (not 32 GB as it currently is).
All other existing features of the Express will remain.
If your detector secured a GPS fix when first turned on, and then cannot secure a subsequent fix the next day, it will default to the previous GPS location and remain in the selected recording mode (e.g. Night Only). However, if you deploy your detector and it does not get an initial GPS fix, it will record in Continuous Recording mode (with the Check LED flashing). The detector requires a GPS fix whenever it is first turned on in order to record relative to sunset or sunrise times.
This may be an issue if you change the batteries, or restart the detector, inside a cave. To avoid this, you can create a schedule with Toolbox that will run from sunset to sunrise (or your preferred times), and manually specify the latitude and longitude using the built-in map. Set the end date to after you expect the batteries will run out, then use the recorder in schedule mode.
Yes, the directional microphone is compatible with both the Express/FS and Swift.
Swift - Below the touchscreen there is a small sticker with a barcode. The serial number is beneath the barcode on the left. The six digits beneath the barcode, on the left, are your serial number.
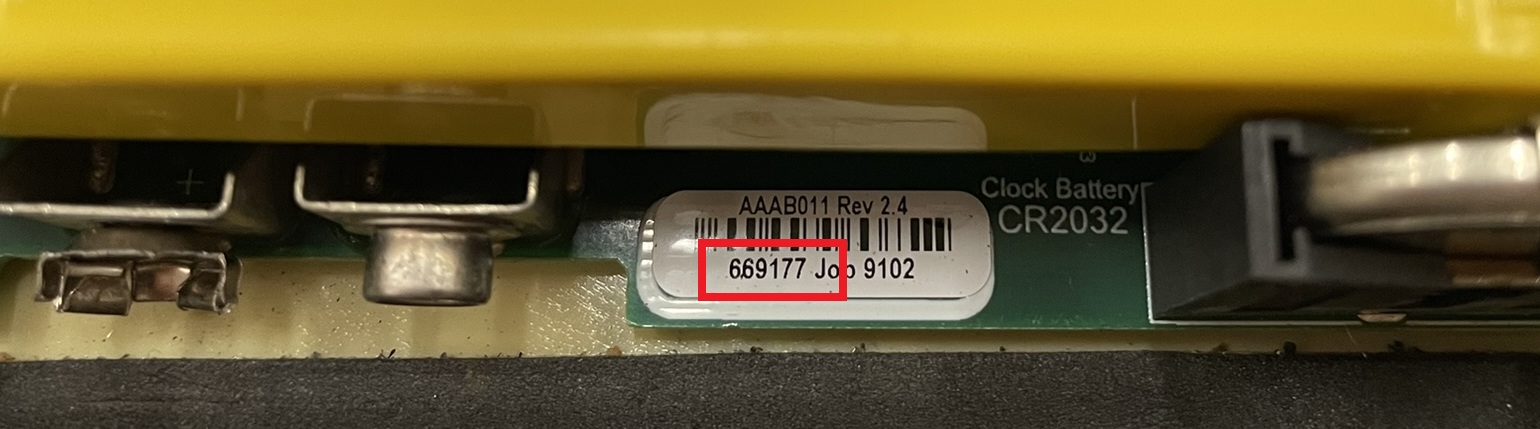
Express FS - Inside the case on the right side, above the instructions sticker there is a white sticker with the serial number. The six digits near the bottom of the sticker are your serial number.
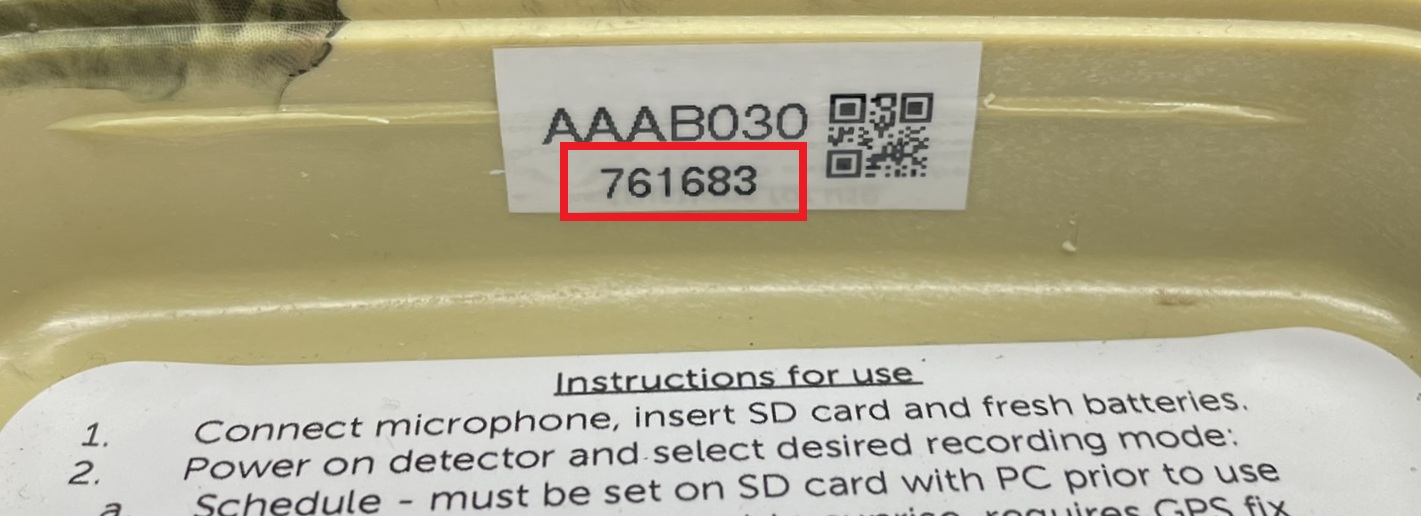
Express - Inside the case on the right side, above the instructions sticker there is a white sticker with the serial number. If this is missing, above the batteries there is a small sticker with a barcode. The serial number is beneath the barcode on the left.